Quota Rules
Quota rules in Coralogix allow you to define hard limits on the volume of data or AI interactions consumed by entity type—such as logs, metrics, spans, or AI agent interactions. Use them to keep usage within plan limits, prioritize what matters most, and reduce the risk of losing visibility when traffic spikes.
What you need
- A Coralogix account with permission to view or manage quota rules.
- One of the following permissions (see the full permissions list):
TEAM-QUOTA-RULES:READ— view quota rules and usage.TEAM-QUOTA-RULES:MANAGE— create, edit, and delete quota rules.
When to use quota rules
Use quota rules to:
- Allocate capacity by priority so critical workloads keep ingesting when traffic spikes.
- Keep usage predictable with clear daily caps.
- Preserve visibility for essential data sources.
- Plan for growth by adjusting allocations as your usage changes.
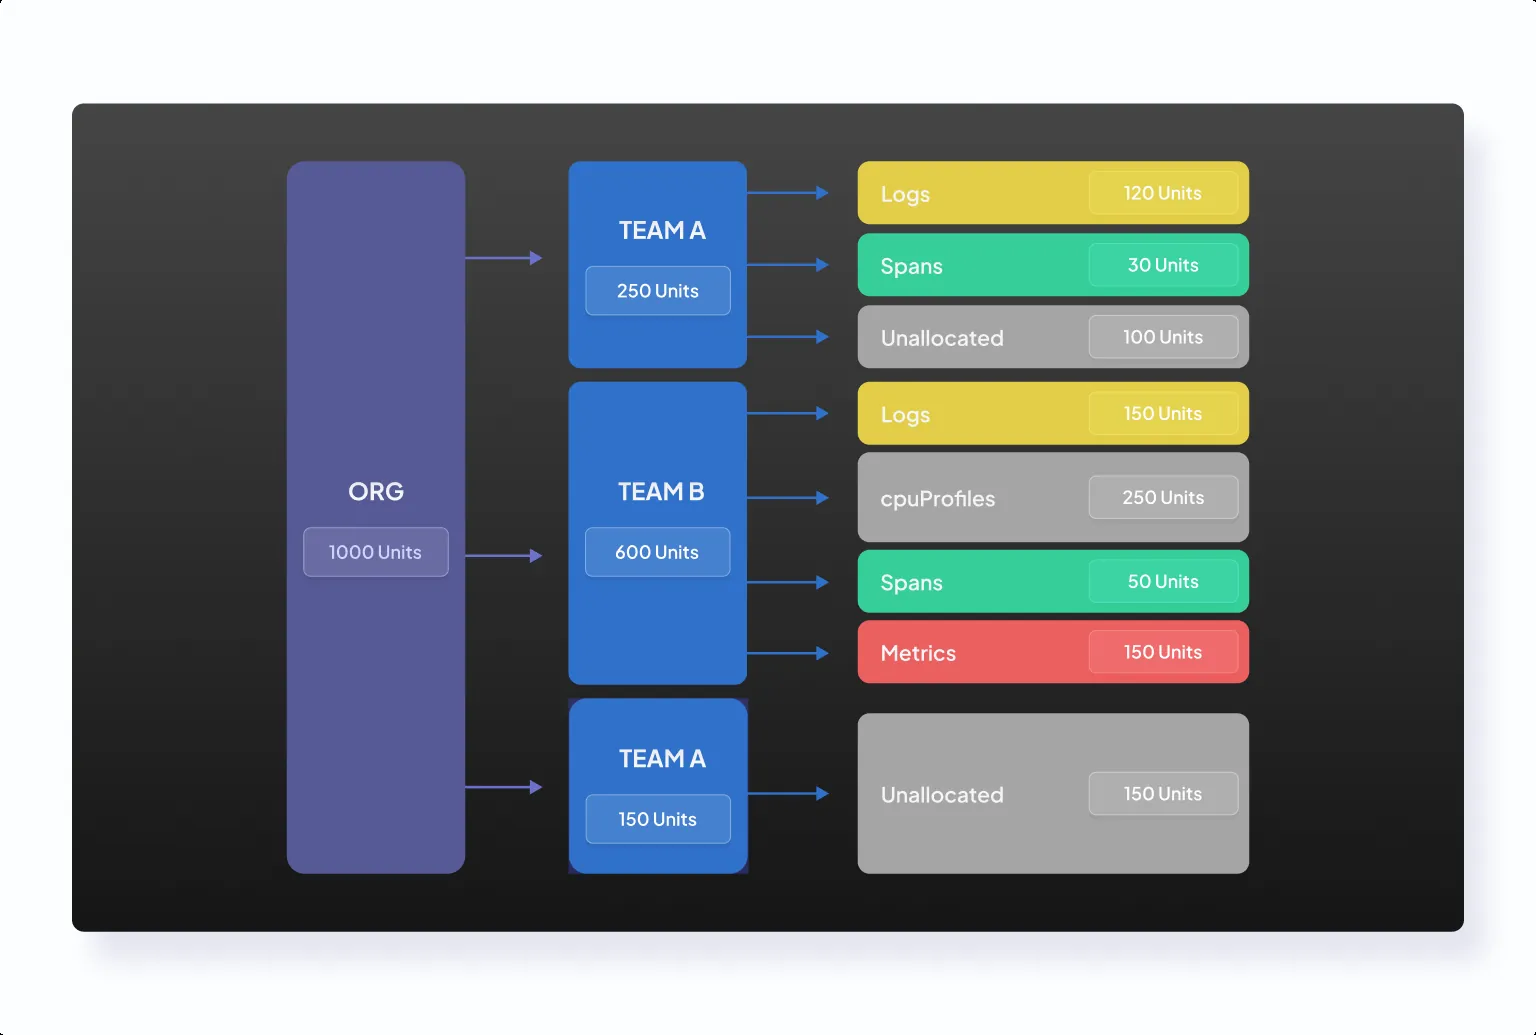
Units and supported entity types
With quota rules, units are allocated per entity type. Entity types act as data types and objects across the Coralogix platform, breaking down data pillars into more granular units.
Currently, quota rules support seven core entity types:
| Entity type | Description | Pillar |
|---|---|---|
logs | Freeform JSON event | Logs |
browserLogs | RUM browser event | Logs |
spans | Spans | Spans |
metrics | Metric series and labels | Metrics |
sessionRecordings | RUM session recordings | Logs |
cpuProfiles | Continuous CPU profiling data | Profiles |
olly | All AI Units consumption — Olly, AI Center evaluations and guardrails, query assistant, and other AI-powered features | AI |
Coralogix uses a unit-based pricing model as a universal billing and capacity metric across observability entity types.
How quota rules work
When data reaches Coralogix, the ingestion layer evaluates it against your quota allocations. If an entity type reaches its allocation, Coralogix stops ingesting additional data for that category. Enforcement can take a few minutes to apply after the allocation is exceeded.
Once an entity type reaches its allocated quota, Coralogix automatically blocks further consumption for that type. For data pipeline entity types (logs, spans, metrics, and similar), Ingress blocking takes 1–5 minutes to take effect. For the olly entity type, which caps overall AI Units consumption, enforcement is applied at the AI service layer and the propagation window may differ. Blocked data or interactions are neither processed nor billed.
- Quota distribution: As you assign entity types, this pie chart shows how your daily quota is split between allocated and unallocated units. Each slice displays both the unit count and its percentage of your total daily quota.
- Last 7 days units: A stacked bar chart showing actual units ingested per day across all entity types, helping you visualize recent traffic patterns.
- Quota notification: A real-time banner that appears when an entity is blocked, providing immediate next steps (such as adjusting allocations, upgrading your plan, or contacting support).
What "blocked" means in quota rules versus TCO
- With quota rules, blocked entity types are not ingested, are not available for search or analytics, and do not incur cost.
- If data is ingested and later blocked through TCO, it can still incur a minimal ingestion cost.
Overflow behavior
Unallocated units form a shared pool.
- By default, only entity types with no explicit allocation can draw from the unallocated pool.
- If you enable Overflow for an allocated entity type, it uses its reserved allocation first, then can continue ingesting by drawing from the unallocated pool (if available).
Example: If you allocate 20% to logs and enable Overflow for logs, logs are guaranteed up to 20%, and can continue ingesting beyond that using unallocated capacity (if available).
Reserve a fixed number of units with Locked Units
By default, an allocation can be expressed as a percentage or a units value, and its effective size shifts as your plan changes or as quota moves between teams. Locked Units mode reserves an absolute number of units for an entity type that stays exactly the size you set—so a critical workload keeps its guaranteed capacity no matter how the rest of your pipeline behaves.
Each quota rule has a mode selector:
- Percentage — the allocation is a share of your daily quota and scales with it.
- Locked Units — the allocation is a fixed unit value that does not drift when your plan grows or shrinks, or when units move between teams.
Use Locked Units when you need predictable, guaranteed capacity for data you can't afford to lose.
Reservation-based billing
A locked reservation bills for its full capacity every day, whether or not you consume it. This is the trade-off for guaranteed capacity: you pay for the reserved units rather than for actual usage.
Guards that protect reservations
Because locked units are absolute, Coralogix prevents changes that would silently break a reservation:
- Plan limits: A quota rule that reserves more units than your plan allows is rejected.
- Team transfers and plan changes: If moving units between teams or a plan change would leave a locked reservation unfunded, Coralogix blocks the action and shows a resolution popup listing exactly which rules to adjust first.
Organization-managed rules
Some entity types are managed centrally. Coralogix-managed entity types (such as olly) can be reserved on your behalf through your account manager and appear read-only to team administrators—they can be changed only by the managing party or through the CX-Bot API. This protects reserved capacity from being overridden by team-level edits.
Current Usage and Historical Trend columns
The Quota Rules table displays usage information in two dedicated columns so you can distinguish real-time consumption from longer-term trends at a glance.
Current Usage
The Current Usage column shows how many units each entity type has consumed today, together with a progress bar that reflects usage against its effective quota:
- For entity types with an explicit allocation, the progress bar is scaled against the allocated units.
- For entity types without an allocation, the progress bar is scaled against the shared unallocated pool.
The progress bar changes color as usage increases:
| State | When it appears |
|---|---|
| Normal | Usage is below 81% of the effective quota. |
| Warning | Usage is between 81% and 100% of the effective quota. |
| Blocked | Usage has reached or exceeded 100% of the effective quota. |
Hover the cell to see a tooltip with the consumed units, the effective quota, whether the quota is allocated or unallocated, and the exact percentage consumed.
Historical Trend
The Historical Trend column shows a sparkline of the last 7 days of daily usage for each entity type. Hover any point on the sparkline to see the date and the daily usage in units (U). Use this column to spot patterns—such as steady growth, regular spikes, or recent anomalies—before you adjust allocations.
Create quota rules
- Navigate to Data Flow, then Quota Rules.
- Select an entity type and set the allocation as Percentages or Units. Use the Allocation slider or enter an exact value.
- Use the Allocation control and the 7-day usage indicators to guide your decision.
- Select Allocate in the Status column to activate the rule.
- Select Save.
Quota rules let you cap total ingestion per entity type. Quota-based routing adds a second layer inside logs: it lets you downgrade or block specific subsets of logs as your daily quota is consumed, instead of relying only on fixed priorities or waiting until you reach a hard cap. This capability is configured as a policy type inside the TCO Optimizer (it is not a separate quota rule type).
When updating a quota rule, you'll see a preview of how the changes affect current allocations before saving. The side-by-side comparison of existing and updated quotas helps validate adjustments, prevent misconfigurations, and manage quotas with confidence.
Current and updated quotas are displayed in interactive pie charts, giving you instant clarity on allocation changes.
In the Quota Rules page, you can:
- View all active quota allocations.
- Monitor current usage in the Current Usage column, which shows consumed units and a progress bar relative to each entity type's allocation (or the unallocated pool for non-allocated entity types).
- Inspect usage patterns in the Historical Trend column, which shows a 7-day sparkline for each entity type.
- Review 7-day historical usage in a stacked bar chart that shows daily units ingested by entity type.
- Filter by data category using the All, User data, and System data toggle to scope the table to user-ingested entity types or to Coralogix-managed system datasets.
- Filter by pillar using the pillar dropdown to quickly scope the table to Logs, Metrics, Spans, Profiles, AI, and more.
- Select measurement type with the Percentages | Units switch to control how allocations are displayed and edited.
- Show only active allocations by enabling the filter to hide unallocated rows.
- Adjust allocations using the Allocation column's slider or numeric input.
- Enable or disable Overflow using the Overflow toggle per entity type.
- Activate or deactivate rules by clicking Allocate or Unallocate under Status.
Quota rules for system datasets
Coralogix automatically populates some dataspaces with system datasets—internal data streams that Coralogix manages on your behalf, such as notification requests and other platform-generated records. These entity types are shown under a dedicated System data category in Quota Rules, separately from user-ingested data.
To review or cap system-dataset usage:
- Navigate to Data Flow, then Quota Rules.
- In the toolbar, set the category filter to System data.
- Select an entity type, set an allocation, and activate the rule—just as you would for user data.
System-dataset rules share your team's daily quota with user-data rules. Allocations and overflow behavior work the same way across both categories, so you can prioritize critical user telemetry and still cap system-dataset consumption from the same screen. Rows in the System data category are shown with a settings icon to distinguish them from user entity types.
Understand the Priority column in log policies
As you assign entity types, the pie chart shows how your daily quota is split between allocated and unallocated units.
How quota rules and quota-based routing work together
Use both when you need hard limits and finer-grained control: * Use quota rules to enforce daily caps per entity type (for example, to ensure logs cannot consume all daily units). * Use quota-based routing inside logs to downgrade or block lower-value log subsets earlier, helping preserve quota for critical log traffic and reducing the chance that all logs are blocked due to a spike.
Quota-based routing for logs
Quota rules cap total ingestion per entity type. Quota-based routing adds a second control layer within the TCO log pipeline: it lets you downgrade or block specific subsets of logs as your daily quota is consumed, instead of relying only on fixed priorities or waiting until you reach a hard cap.
You do not need to configure quota rules to use quota-based routing — they are independent features that can be used separately or together.
This capability is configured as a policy type inside the TCO Optimizer—it is not a separate quota rule type.
How quota-based routing works
In the TCO Optimizer, standard policies apply one fixed priority (High, Medium, Low, or Block) to all matching logs.
Quota-based policies apply different priorities at different points in the day based on quota consumption. Evaluation happens continuously during ingestion.
You can define up to three priority tiers in a single policy, so data degrades gradually instead of dropping from High straight to Block at one threshold. For example, route the first 50% of quota as High, the next 30% as Medium, and block only as you approach the limit—preserving critical signals while shedding lower-value data first.
Create or edit a quota-based log policy
- Navigate to Data Flow, then TCO Optimizer.
- Select Logs.
- Select Create policy (or open an existing policy to edit it).
- In Details, set Policy name (required), Description (optional), and Policy order (First or Last).
- In Filters, define what the policy matches:
- Use Builder for common conditions such as
application,subsystem, andseverity. - Use Expression to define advanced logic, including DPXL-based filters.
- Use Builder for common conditions such as
- In Policy type, select Quota-based.
- In Priority, configure how priority changes as quota is consumed:
- Relative sets each threshold as a percentage of the daily team quota.
- Absolute sets each threshold as a units value.
- Add up to three tiers, each mapping a quota range to a priority (for example,
High, thenMedium, thenLow). Define each tier as a quota range with its priority. - Set the default priority applied to everything beyond the highest configured threshold. It is prefilled from your system TCO default and can be changed; set it to Block to stop ingesting lower-value logs as you approach the cap.
- Tiers must be monotonic: thresholds increase and the priority does not become less restrictive as quota fills. The editor prevents you from saving a non-monotonic configuration. Block is a terminal tier—no tier can follow it.
- (Optional) Set Archive retention (None, Default, Short, Intermediate, or Long).
- Review the Preview panel for impact on recent data (see next section).
- Turn on Enable policy to activate immediately, then select Create.
Preview quota-based behavior
Use Preview to validate expected impact before saving:
- Switch between Last 24 hours and Last 7 days.
- Review Data sent and the estimated % quota and Units (U) impact.
- Use Group by to break down results by application, subsystem, or severity, and identify which combinations are consuming quota.
Preview reflects how the policy would have applied to recent traffic — it is not a guaranteed projection of future behavior.
Understand the Priority column in log policies
For quota-based policies, the Priority column can show a transition, for example High → Block. The highlighted value represents the currently active priority at that moment in time.
Notifications
When an entity type is blocked due to reaching its allocation, the Quota Rules page shows a banner with next steps—such as adjusting allocations, upgrading your plan, or contacting support. The banner clears automatically once the condition is resolved.
Permissions
Depending on which actions you want to execute in quota rules, the following permissions are required.
| Resource | Action | Description |
|---|---|---|
TEAM-QUOTA-RULES:READ | READ | View quota rules. |
TEAM-QUOTA-RULES:MANAGE | MANAGE | Manage quota rules. |